I was on etsy yesterday just browsing through shops, my coworker and I were talking about little dolls and she told me I needed to do one out of paper, I must admit in the past I've contemplated this but was afraid to try - there are some quillers out there who do the most gorgeous miniatures and I didn't know where to start. Over the past year or so I've learned a few techniques and the idea of a miniature doll didn't seem so far off, so around 9 pm last night I told my husband I was going into my computer/craft room and I wasn't coming out until I had something.....well, 3 1/2 hours later I was done, little miss adrianna was complete - I still have to create her stand but that will be tonight or tomorrow and I'll post that photo then.
I took photo's as I went, something I've never done but I wanted to share with everyone my work process.
Here are the steps it took for me to create my paper doll.
Step 1 - sketch out what I want it to look like , look at that cutie
Step 2 - Create head and add hair
Step 3 - Once hair is complete, make neck and shoulder area (not shown) to hold up dress
Step 4 - Cut out dress from scrapbook paper, glue on to shoulder area
Step 5 - Once dress is on, create legs and shoes
At this point it was getting late so I guess I wasn't thinking about taking photo's I then created the sleeves and little hands, painted the legs and face - added a bow and she was complete, tonight I will create her stand
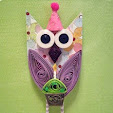
Final Side View
Final Front View - not bad for my first doll and too cute if I do say so myself
My son wants to know if I can make little boys so that will be next, not sure about those; but I definitely look forward to expanding on my paper dolls.